Showing posts with label Art with Children. Show all posts

Tuesday, October 27, 2015

Pumpkin D-I-Y


Picking out the best looking pumpkin in the patch and taking it home to carve has become a Halloween tradition that has been passed down from generation to generation. If you have ever taken the time to carve a pumpkin, then you know that it is definitely not as easy as it seems. Cutting the circle around the stem, scooping out the slimy pumpkin guts, and carving a design is a time consuming and not to mention, a messy feat!

It seems like every year, the traditional triangle-eyed, triangle nosed, and tooth-y smiled pumpkin seems to be slowly disappearing.  The carvings on pumpkins get more and more intricate as the years go by. It kind of seems impossible to compete with these multi-layered and 3 dimensional carvings. So, if you’re not the most talented or a pumpkin carving genius, then you’re in luck! Here are few fun and easy alternatives to traditional pumpkin carving:

Sleek and Studded:

 For this edgy and oh so stylish pumpkin you’ll need black matte spray paint and a couple dozen gold and silver studs.

        Tips:
·      Wipe down your pumpkin with a damp paper towel
·      Newspapers! Be sure to lay down a ton of newspapers before you spray paint your pumpkin
·      2-day project! It might be a good idea to spray paint your pumpkins black one day and when they’re dry, or the following day (just to be safe) then add the studs
·      To get the flat-backed studs to attach, I suggest using E-600 or Super Glue

A Little Sparkle Never Hurt:

This super sparkly pumpkin is sure to draw attention when the light hits just right.
           
Tips:
·      Wipe down your pumpkin with a damp paper towel
·      Use Modge Podge or spray paint on your pumpkin as the “glue”
·      OR have your child paint a design on the pumpkin and then sprinkle a lot of glitter onto the wet paint
·      OR spray paint the pumpkin your favorite color, then only add sparkle to the stem

Glowing Goblin:

This pumpkin brings a bright and fun twist to the traditional tea-light glow, and  a great opportunity for kids to get creative

 Tips:
·      Wipe down your pumpkin with a damp paper towel.
·      Use newspapers underneath
·      You’ll need several colors of glow-in-the-dark puffy paint
·      Use painter’s tape to help create fun designs


Sources & Inspiration:


~ Sara Luckham
Social Media Specialist
Seaside Staffing Company 


Monday, March 2, 2015

Happy Birthday Dr. Seuss!

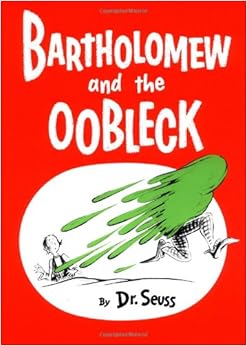
Happy happy birthday to the one and only Dr. Seuss! This American writer and cartoonist would be 111 years old today! SO...we thought we would pay tribute to this lovely, looney, tooney legend with a craft from one of his famous stories, Bartholomew and the Oobleck
As a child, this was one of my favorite rainy day activities and would keep me entertained for hours. :) This super simple oobleck slime recipe will guarantee a goopy good time (with barely any ingredients!) 
WHAT YOU NEED:
  • 1½ cups of cornstarch
  • 1+ cup of water
  • green food coloring
  • glass mixing bowl
  • mixing spoon
  • newspaper or other covering for a work surface
Then just slowly mix together the water and cornstarch and add the food coloring to achieve the desired slime green! For the complete instructions, click HERE 
Have your child experiment with the different forms the goop will take, it's like magic! 

** When finished, do not pour the oobleck down the drain as it will clog. Dispose in the trash** 

Wednesday, January 28, 2015

Valentine's Day Craft Idea!

Well January has come to a close and February is just around the corner. Wow! We wanted to give a some fun Valentine's Day craft ideas over the next few weeks to inspire some creativity for you and your children. 
When I was little, I was fascinated with melting crayons and making crafts out of the wax. I have done this craft in the past, but a step by step guide is on Martha Stewart's website too. How gorgeous are these hearts? It's also a great craft to do as a family as each person can customize their shape, colors and design. The possibilities are endless! 
All you need is:
- Wax paper
- Wax crayons of various colors 
- Handheld pencil sharpener
- Iron
- Craft paper 
- Scissors
- Yarn, thread, twine etc. (to hang the hearts) 
To see the how to make these beautiful and easy decorations click HERE 

Wednesday, October 22, 2014

Tie Dye Technique With SHARPIES?!

We can't WAIT to try this one out :)
Super simple craft that would make a great gift too. Check out the full post HERE
Here is what you need to create this fun craft:
  • a plastic vinegar jug
  • Sharpie Fine-Tip Permanent Markers
  • rubbing alcohol
  • spray varnish
  • medicine dropper or pipette
  • ribbon, twine or cording
  • button
  • scissors, hole punch 

Cut out your bookmark:

To remove the label from the vinegar jug, I filled the jug with very hot water, and let it sit for 10 minutes.  The heat from the water softens the glue, and the label peels off easily.
To make our bookmarks, I traced one of my own bookmarks on the plastic with a pencil, and used a pair of sharp scissors to cut it out. I repeated the process, getting 4 bookmarks out of one vinegar jug.

Color your bookmark:

Next, we colored our bookmarks.  Using a variety of bright colors, cover your entire bookmark with your Sharpies.  There’s no right or wrong way to do this.  Just fill in the whole bookmark.

The Sharpie and rubbing alcohol tie-dye technique:

Fill a dropper/pipette with rubbing alcohol and drip small drops on to your bookmark.  You can tap your dropper against your bookmark – that will deposit tiny amounts  on to the plastic, or you can just drip the alcohol randomly over your art.
Then let it sit.  Do not move the bookmark, or tip it, or all of your colors will run together.  Just watch it, and you’ll see the colors start to blend and fuse together.  It’s so magical and beautiful.
You can experiment with the amount of alcohol you use.  If you’re not happy with the way things are going, you can swipe the bookmark clean and start again.  A paper towel is good for this.

Setting the color:

To prevent your Sharpie art from rubbing off, you need to give it a shot of spray varnish.  Do not brush on a liquid varnish as it will likely dissolve your art.
Lightly spray your bookmark with the varnish.  If you use too much, it will activate the Sharpie ink like the alcohol did, and your colors will start to bleed again.
Allow your varnish to dry, and spray with a second coat if you like.  You don’t have to be quite as careful with your second coat of varnish because your art has been protected by the first coat.
Once your varnish has dried, punch a hole in the top of your bookmark, thread a ribbon or some cording through, and if you like, embellish with a pretty button.

Monday, July 7, 2014

31 Ideas for Summer Fun!


With the holiday weekend behind us, there is only about a month of summer left.  But a month can seem like fooooorever when the kids are home all day in this hot San Diego weather we have been having.  It is so important to keep the kids entertained with crafts, outdoor play, neighborhood friends but most of all keep their minds engaged and BUSY!

Here is a simple list of '31 days of summer fun' thanks to "Let Me Start By Saying" to use as a basic guide for ideas!  We love these creative projects and ideas for kids of any age and they truly are a great way to get the family up and moving together!
Day 1
Start summer scrapbooks! Prepare to cherish these memories forever! Celebrate by treating your kids to whatever they want at the ice cream truck!
Day 2
Neighborhood scavenger huuuuunt!
Day 3
Handmade apology notes to neighbors whose gardens were trampled/gnomes toppled by your kids during neighborhood scavenger hunt!
Day 4
Recycle everything kids collected during neighborhood scavenger hunt as punishment for fighting over who actually won the scavenger hunt because everything has to be a contest to them!
Day 5
Visit local farm for berry picking! Make your own juice and ice pops from fruit you picked! Calmly tell the kids "No" when they hear the ice cream truck, because you just made cold treats!
Day 6
Make your own stain-remover to save the clothes worn while working with the fresh fruit! Teach the art of folding and putting away clean laundry!
Day 7
Break out the stickers, markers and glitter to add the first week's activities to the scrapbook!
Day 8
Remove/black out all incriminating evidence the kids put in the first week's entries in their scrapbooks!
Day 9
Nature walk! Forget to bring enough water, so agree to buy stuff at ice cream truck even though you're a little surprised to see one out there in nature!
Day 10
Pajama day while you all recover from poison ivy contracted during nature walk!
Day 11
Look up at-home science experiments & try some at home! Turn up the radio when you hear the ice cream truck approaching!
Day 12
Look up Sew-Your-Own Eye Patch online and everyone can make one for the kid whose eye was damaged during the "At-Home Volcano" incident yesterday!
Day 13
Make your own chalk, then decorate driveway, then calm crying kids when passing summer rainstorm washes it all off the driveway before dinner!
Day 14
Use remaining homemade sidewalk chalk to decorate this week's page in scrapbooks!
Day 15
Make tie-dye shirts for the whole family. Let them use their own money at the ice cream truck when it comes by as you bring the shirts outside to dry.
Day 16
Field trip to the mall to buy everyone in the house new white underwear and T-shirts because the tie-dye stuff turned everything you washed last night a blotchy pink.
Day 17
Open summer care packages from Grandma filled with toys, books and other activities.
Day 18
Dump bins full of toys into garbage bags and bring them to a donation center since the kids prefer to play with empty boxes rather than the toys, books and other activities inside them.
Day 19
Beach day! Of course there's no way to avoid the ice cream truck out there!
Day 20
Spend the day cleaning sand out of car, garage, mudroom, hallway, kitchen, laundry room, 10 towels, six swimsuits, three changes of clothes per kid, the closet, living room and bedrooms.
Day 21
Break out the scrapbooks again for updating. Search house for a couple pencils and a sticker you got at the grocery store yesterday, since the art supplies have gone missing.
Day 22
Print out kid-friendly recipes, then go to Farmer's Market for ingredients. Spend the day in the AC teaching them to cook.
Day 23
Order in pizza while the kids clean out the fridge: at least two of them woke with a snotty summer cold, and you just know all the food they made yesterday is seasoned with infectious boogers.
Day 24
Go to Target with gift cards your kids have collected from birthdays. Let them buy whatever shutuppery they want. Discreetly flip off the ice cream truck as you pass it on the highway (IS IT STALKING YOU???).
Day 25
Take the kids to the park. Leave park after 400 rounds of "It's too hot," "I don't like my sandals" and "I want snack -- no, not THAT snack," and toss them all into the playroom while you hide, rocking in a corner.
Day 26
Turn on sprinklers. Drink while kids ruin the lawn. Stare at ice cream truck with the burning hellfire of eternal hate when it stops at the edge of your lawn, causing your kids to freak the freak out until you give in.
Day 27
Spend the day at the movie theater. Feed your pain over how long this month has been with Junior Mints and popcorn.
Day 28
Remember it's scrapbook day. Go back to bed while kids do... whatever. I just don't care anymore.
Day 29
Watch TV all day. On separate TVs. Egg the ice cream truck when it dares drive down your street again.
Day 30
Dig out all the iPads you hid four weeks ago. As long as the game is free, allow kids to "buy" as many as they want as long as they stay quiet.
Day 31
Pay whatever it takes to get all your kids in camp until the first day of school.

Monday, May 12, 2014

Snow in Summer?!

Here in San Diego, it is getting HOT HOT HOT!  It is supposed to reach over 100 degrees by Wednesday! WHEW!

Discovering fun and easy ways to keep the little ones entertained as well as cool is a challenge all on its own.  So we are here to help!
Thanks to "Growing a Jeweled Rose", we can make it snow in the middle of summer!

http://www.bathactivitiesforkids.com/2013/02/snow-day.html


This bath snow is super simple to make and 100% tub safe!  All you need is baking soda and water.  That's it!  To make the bath snow slowly add water to the desired amount of baking soda until it is mold-able and damp but not too wet.  If you accidentally add too much water just add more baking soda.  Then pop the snow in the freezer for half an hour or longer before it's time to play.  This makes the snow cold and crunchy JUST LIKE REAL SNOW!


Baking soda quickly dissolves in water meaning it won't clog your drains and will actually clean them!  Baking soda is also great for skin and gives kids bath water a therapeutic attribute.
Not only does this activity provide exciting entertainment, but creating sensory play can be educational as well!

SHARE THIS

Bookmark and Share